|
by: Andi @ Cirrutopia
How to win all the things.
by: Andi @ Cirrutopia
What is the dreaded (but hilarious) overpose and how do I stop it?
by: Andi @ Cirrutopia
Want to make those beautiful 3D-looking PetzPix? Here's how!
by: Andi @ Cirrutopia
adding wings to your PetzPix
by: Andi @ Cirrutopia
Want to make those beautiful 3D-looking PetzPix
by: Andi @ Cirrutopia
making your PetzPix into a vector image
by: Andi @ Cirrutopia
adding wings to your PetzPix
by: Silver @ Silver's Petz Site
How to retrieve petz that have runaway in the game.
by: Andi @ Cirrutopia
learn what's going on in the [Ballz Info] section
by: Andi @ Cirrutopia
the rarely-used but awesome [Head Shot] section
by: Andi @ Cirrutopia
How to make your own AOL Chatroom... just in case you were wondering. File this under the same place as "What to do when your 3 1/2 inch floppy won't eject."
|
This tutorial assumes that you have some very basic knowledge in using Paint Shop Pro 7. Be sure to save your work every five minutes or so.
First, open the picture you want to use. This tutorial assumes that you are using a PetzPix, but you can use real life photographs, drawings, or other things, if you'd like.

If you're using a PetzPix from Petz 1, 2, 3, or 4, you'll need to convert it to 16-million colors. Click "Color" on the top menu and hover over "Increase Color Depth." Click "16-million colors."
Now we're going to make layers. These layers are like transparent pieces of plastic or glass over your image. Maybe this example will help you understand how it works. In your mind, picture a photograph of your bratty little brother sitting on a table. The photograph and table is your background layer. You place a piece of clear glass on top of it. You draw (ON THE GLASS) devil horns so it looks as though your brother is the devil. You place a sheet of clear plastic on top of the glass and draw a tail so it looks like your brother has a tail. If you move the plasitc or the glass, the image gets messed up.
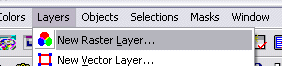
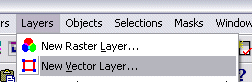
We're going to add a Raster Layer. Click "Layers" and then select "New Raster Layer" from the drop down menu.
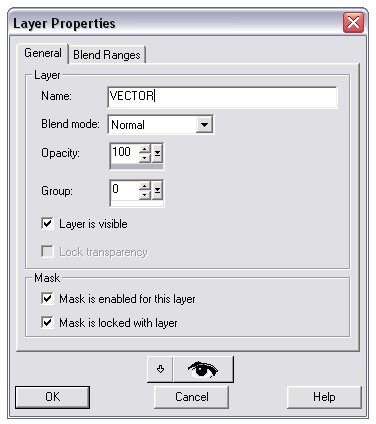
When you do this, a menu appears. Fill it out like the menu below.
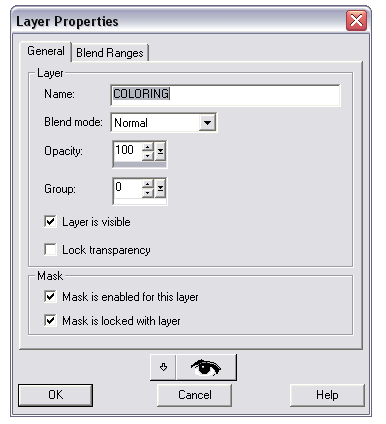
Now we're going to make another layer. Ready?
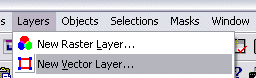
Click "Layers" again, but this time, select "New Vector Layer."
When you do this, a menu appears. Fill it out like the menu below.
Save your work as a .psp (Paint Shop Pro Image) file.
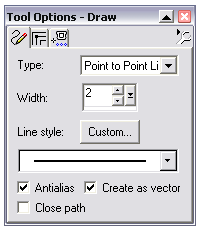
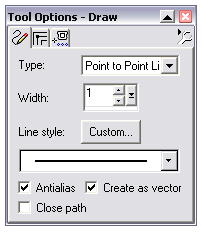
Somewhere on the screen, you should have a "Tool Options Box." Select the draw tool  from your menu on the left. It's a pencil with a line coming out of it and it's towards the bottom. When that's selected, fill out the Tool Options box with the settings below. from your menu on the left. It's a pencil with a line coming out of it and it's towards the bottom. When that's selected, fill out the Tool Options box with the settings below.
|
 |

|
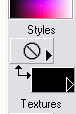
Make your color pallete look like this. I don't mean the stripey thing, that's just because this is a .gif picture. Make it look identical from the word "Styles" down to the bottom. |
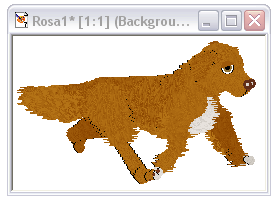
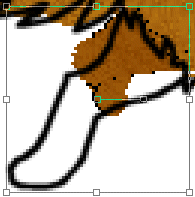
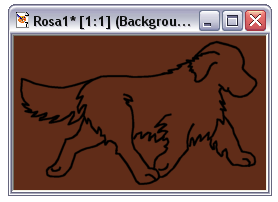
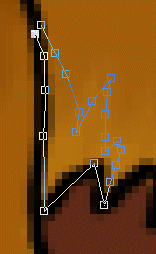
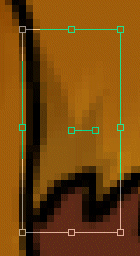
Zoom into a section of your PetzPix. I've chosen to begin with Rosa's ear. Start using the Draw tool to make a line around the ear.
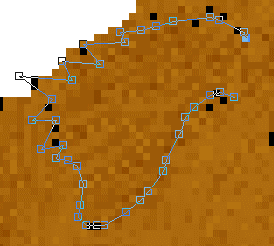
When you've finished making the line, hit Ctrl-Q on your keyboard.
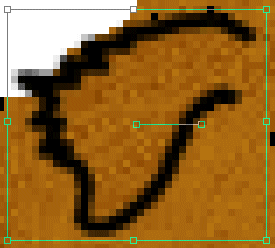
Repeat the last two steps until there's black outlines everywhere you want them. Feel free to change the image a bit as well, as I have done below.
Save your work as a .psp (Paint Shop Pro Image) file.
You're done with the longest step!
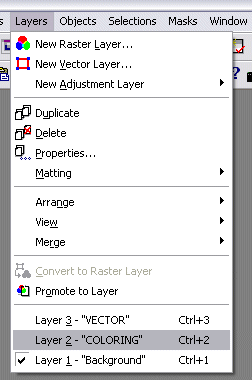
Now go to the "Layers" menu and select the layer which is named "Background."

Select the Paint Can (Flood Fill) tool and set the "Tool Options" box to the following settings:
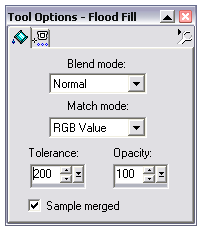
Make the background a solid color. Any color will do.
Save your work as a .psp (Paint Shop Pro Image) file.
Select the layer which we named "COLORING."
|
Select the color you want to color part of the dog. Then select the Paint Can (Flood Fill) tool and change the settings in the Tool Options box to match the settings below.
|
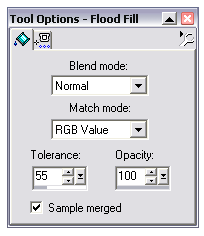 |
Select the color you want to color part of the dog. Then select the Paint Can (Flood Fill) tool and change the settings in the Tool Options box to match the settings below.
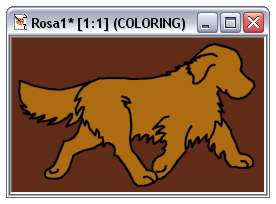
Now color your picture in by clicking inside the black lines with the Paint Can tool. If the color doesn't stay inside the lines, make the Tolerance number on the "Tool Options" box lower or make sure your black lines create a fully enclosed area.
Save your work as a .psp (Paint Shop Pro Image) file.
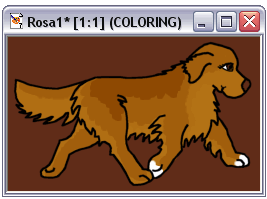
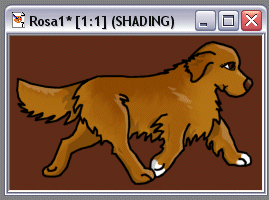
I'm going to give Rosa an eye.
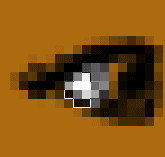
I went to the "VECTOR" layer to do the black lines exactly the way we did them before, and then went back to the "COLORING" layer to color the eye in. I used the brush tool to color the eye rather than the paint can.
I also added two white feet. You can add markings and such if you'd like at this point.
Save your work as a .psp (Paint Shop Pro Image) file.
Now I think Rosa should have some different shades of orange in her coat. Nova Scotia Duck Tolling Retrievers have many different shades of color in their coats. If you want, you can use Google Images to search for a reference picture.
I drew in the different shades using the brush tool.
All those different colors look a bit choppy. We need to blend them together. Select the "Retouch" tool (it's a white hand with a black outline on the left tool pallete. Set the options to match the ones below.

Now it's time to smudge. Click on the area you want to smooth out and drag the mouse. When you let go, that's what a smudge looks like.
Save your work as a .psp (Paint Shop Pro Image) file.
Here's Rosa with the smudging completed.
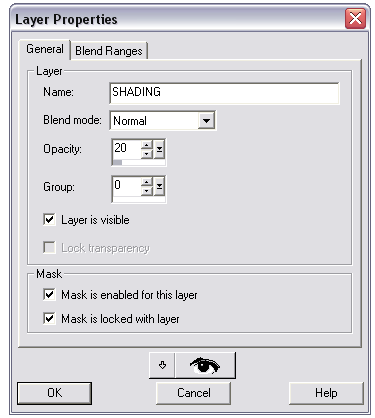
Now it's time to add some highlights and shadows. We're going to add another Vector layer.
Click "Layers" and select "New Vector Layer."
Ah that option box popped up again, didn't it? We're going to have to make one change this time. See where it says Opacity? Make that somewhere between 15 and 25.
Save your work as a .psp (Paint Shop Pro Image) file.
Now go find the draw tool again. We're going to make the settings on the Tool Options box match the ones below.
We're also going to make the color pallete options look like these.
Now draw around the area you want to add a shadow to.
Hit Ctrl-Q on your keyboard.
There ya go! That's your shadow! Add all the shadows you want. When your done with the shading, change the color on the Color Pallette from black to white and add highlights in the same manner.
Save your work as a .psp (Paint Shop Pro Image) file.
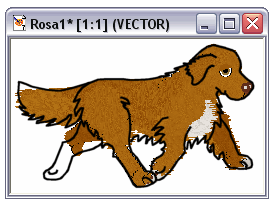
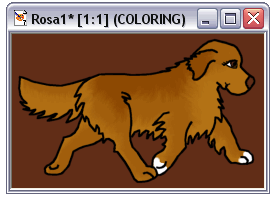
Zoom out to see your finished product.
There ya go! That's your shadow! Add all the shadows you want. When your done with the shading, change the color on the Color Pallette from black to white and add highlights in the same manner.
Now you might want to get rid of that background color. Click "Layers" on the top menu and select the "Background" layer.
You can either draw on it or you can paste a picture into the background.
I've chosen to paste a picture into the background.
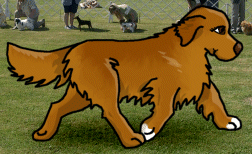
That's it! You're done! Congratulations!
|